
some of you readers may remember one of my first posts about a succulent arrangement i made.
today my paper writing break revolved around trying to salvage a plant that has not been liking it here at my (our) house. i don’t usually have a hard time taking care of plants… especially succulents! lately i have even gotten my orchid to bud. i am thrilled about this.
one succulent in particular, called “string of pearls” (botanical name: senecio rowleyanus), is one that i have always wanted to have in my collection. it looks exactly like what it’s named for. a glorious green string of pearls! my sweetie bought me one a few months ago. it was large, flourishing and gorgeous.
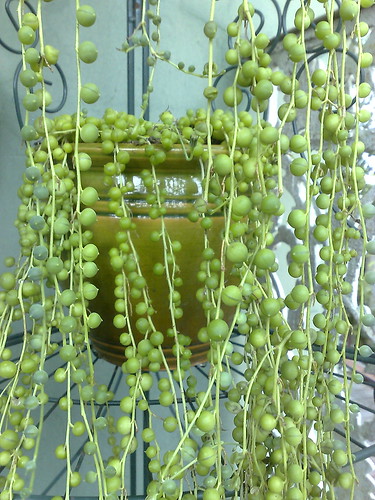
but, my big “string of pearls” plant got smaller and smaller the more rain we got. it hasn’t had time to dry out and hasn’t got enough sun as the light changed and started heating different parts of the area around our house.
so, i decided i needed to do something about this! i couldn’t handle letting it die.
from my experience in the past with this plant– it can’t get too dry. now i know the soil can’t be too wet either! it’s kinda like Goldilocks….. she like her soil just right. iv’e (finally) done a little more reading on this particular plant. here is an article that is simple to understand and has loads of good info on this stunning succulent.
 so….
so….
– i started by taking some strands out of the big plant and found another home for them. i have another little succulent arrangement in a pot that has also gotten kind of soggy recently.
– first i took out some of the wet dirt out of the new pot, since it doesn’t have a drainage spot. (i got this pot from my grandmother and i love it. i am sure she got it from her travels somewhere. i miss her so!)
-i added fresh cactus mix to the pot and then put a bunch of the little green pearl strands and little pearls into the dirt. i also put some of the strands that still had roots into the pot, taking off all the dead and rotted part. i also had a tiny little pot by a native american artist that became a home for a few bits of the plant as well.
the pots now have a new home on a windowsill that gets a lot of afternoon sun. i have read that these plants can get burned easily by too much hot sunlight as well. so i will need to keep an eye on them.

the big pot has been moved to a sunny spot outside. i think it will like it’s new home there.

here are some succulent spruce tricks that are helpful this time of year
remove any dried leaves that may have fallen into the pot and are covering the dirt or rocks. having this excess plant matter on top of your soil can cause the plants to rot where the stalk hits the soil, which happens easily to succulents.
clear out all the beautiful little volunteer sprouts that may be popping up. simultaneously check to see if there are any little baby succulents trying to take hold. nourish them by making space for them and coaxing them out of their hiding place under other leaves or dirt.
lastly…. look to see if there are any pots that seem to be lacking dirt, have roots sticking out the bottom, or don’t look too happy even if you haven’t changed their habitat. this may be a sign that you need to re-pot or just need to add some fresh dirt.
happy planting!
") i love to customize gifts, creating hand made, one-of-a-kind items. i love giving gifts so much that i often pair what ever i make with store bought item i know they will enjoy because i usually can’t help myself. in this case i gave my dear friend two kinds of loose tea i bought at a teashop in Claremont, CA. what a sweet little place.
i love to customize gifts, creating hand made, one-of-a-kind items. i love giving gifts so much that i often pair what ever i make with store bought item i know they will enjoy because i usually can’t help myself. in this case i gave my dear friend two kinds of loose tea i bought at a teashop in Claremont, CA. what a sweet little place.
side note:
if you find yourself in Claremont the Cheese Cave is a must! an amazing selection of cheese, beer, wine, home goods and fine foods. owned by hip young folks with a passion for food that nourishes you and the planet! i would also recommend the tea shop. a wonderful tea selection and a ton of cute tea accessories. while searching for images i found this blog with a bit about Claremont. i hadn’t read this blog previously but i loved the context he gives to this city.
ok… back to the project! ![]()
this dear friend of mine who i made this gift for, taught me the phrase – “TCB” which many of you probably already know, stands for “taking care of business”. so made her a “TCB” notebook with a built in folder to keep important papers or notes handy. i constructed it so it could be hung up on a bulletin board/refrigerator or folded like a traditional notebook.
attaching the paper in a simple way, so it can be used over and over again. i thought i could continually make her new pads of paper whenever she runs out. hopefully she will use it for years to come.
here is how i made it! ( i don’t have a picture for every step of the way but i hope the photos i do have help you create this. feel free to ask any questions you have if something isn’t clear!)
– find a large piece of very thin, pliable mat-board or cardboard. fold it in half to start planning out where the notebook paper will go. This is also a good time to plan the placement of your images & decorative paper.

– gather your notebook paper & cut it to size. the size should be determined by how big you want your notebook to be. it should also be relative to the cover.

-stack all the pages together and punch two holes towards the center – see above photo for placement. if your paper is much larger you may want to make more holes. i like to use push pins to make the holes. leave the push pins in and clip the papers together with binder clips. this helps the holes stay in alignment.
now you can start creating your masterpiece! to make this i only used collage which is something i hadn’t done in years. i did use a little paint in the end (but more about that later)
-block off the area where the notebook paper will be and the area for the folder.

this is the bottom portion of the piece of cardboard. the orange section is where the paper will be attached.
– to make the folder i glued the sides and bottom edges down of the map paper leaving the top unglued. make sure that the background is dry before you put in your folder to make sure it doesn’t get stuck!

the map is the pocket!
i used glue to keep all the pieces of paper down & matte modge podge to finish. keeping the different papers looking like the lovely unique papers they are
– for the cover- i decorated it with all the different papers but i also wanted to do a color wash of sorts creating an aged look. so i mixed a small amount of paint into the modge podge and strategically placed it around the images.

before the extra paper & color wash

a bit more paper & a color wash
– place the pages down into the blocked off area. use the push pins to make small holes in the cardboard cover behind the notebook paper. while the push pins are in the paper & the cardboard cover clip the notebook pages to the cover with larger binder clips. this will make it easier to get the twine through the holes
– use another push pin to punch 2 more holes in the cardboard cover above the holes in the notebook. this will be used to loop the thread through.

– to attach the paper remove the push pins. attach the notebook paper to the cardboard one side at a time.
– use a needle with a big eye and thread thick twine from the front of pages through the cardboard cover. leave a long piece of twine in front of the notebook pages. then, push the needle up through the other hole in the cardboard above the paper. tie both sides of the string the notebook paper. do the same on the second side of holes.
the idea being that the knots aren’t on the back side of the notebook. making it easy to write on up against a hard surface

– dab some glue on top of the knots and cut ends.

you’re done! ta-d-ha!
i pay homage to those who are expert instruction writers and have enough experience to know to take photos each step of the way
i truly hope some of you will be inspired to make your own notebooks as a gift, or for yourself.
as a side note i LOVE to use recycled paper from old projects & all of these materials are recycled or found.
")
oops one of the recycled papers got put in backwards! this is a VERY old print i made

6 years ago as i sat waiting for a massage in a small kitchen in santa cruz in “sarah’s nest”. sarah placed a deep brown fragrant cup of tea in my hands. suddenly the wonderful aroma of her little house made sense. i held my lips to the cups edge tasting the rich sweet liquid. i was pulled back into my childhood body. on saturday afternoons where the grown ups drank tea while i ate gingerbread animals and cheddar cheese. my mom would let me sip on the tea.
Good Earth Sweet & Spicy original is a flavor of my childhood and a part of my present.
The other day I woke up and made myself a cup only to find myself on a 2 hour phone call. When I got off the phone it was cold and I was ready for a smoothie. i put my fruit, yogurt & greens powder into the blender. i then opened the refrigerator to see no milk (almond or cow!). there was the cold, sweet flavorful tea on the counter. and so this recipe was born.
i love the taste of sweet smoothies but i like to cut out extra sugar where i can because it’s hidden in so many foods.
so i thought (read as lightbulb!) Good Earth Tea- perfect! it’s sweet on it’s own without sugar. so i added that cute little cup of cold tea to my smoothie as the liquid portion. here’s the recipe. ENJOY!

ingredients:
1 1/2 cups (12 oz.) of water
1-2 Good Earth Tea Sweet & Spicy Original tea bag
1 cup greens (either baby spinach or fresh kale)
½ cup frozen unsweetened blueberries*
½ cup unsweetened peaches*
½-2/3 cup plain yogurt either greek or regular depending on desired consistency.
1-2 teaspoons greens powder (optional)
*use any of your favorite fruits. banana would be fabulous in this! there are so many possibilities!

to make:
bring water to a boil and steep tea until the water is very dark.
set aside to cool (or make ahead of time- maybe even make good earth tea ice cubes)
put fruit, greens, yogurt, & greens powder into the blender
add about ½ the tea & start the blender
add more tea in increments until the desired consistency is achieved

sweet morning to all!
 i would apologize for my consistently punny and/or quirky titles- but that’s just who i am! so i can’t. i hope you can laugh at them with me.
over the weekend i was thinking about how my life has been surrounded by art and creativity and how we are shaped by those around us. when we are young and our views are forming we SEE possibility through what others do and accomplish. the people around us encourage us to do things either with positive feed back or assure us with other actions. we learn what we are good at in the context of those around us.
so it is not wonder that i view the world with art colored glasses. artistic creativity has surrounded my life since my upbringing. just as those have been brought up in a family of musicians, or writers, or farmers or anything else. our childhood experiences shape our lives indefinitely…. no matter how much we fight it.
when working with people i shouldn’t be surprised, when they find themselves out of their comfort zone and stuck saying “i can’t do art”. it is in these moments i try to help them find their inner creative voice in whatever shape that takes on. as i move more and more into the health and healing world, i hope to be able to find new ways of teaching others to access their inner abilities of stretching beyond what they think they can accomplish. helping them move into untouched spaces in their lives.
and as i think about my commitment to working with people whether in art or in health and wellness i remember i am on my own journey of healing and self-care right along with them.

there a few things i find myself not wanting to do this morning. one of them, is trying to explain something to readers that makes me feel vulnerable. but this is what the whole experience of blogging has really been about. feeling vulnerable, sharing my thoughts and simultaneously feeling empowered by the experience of sharing.
the contrast of vulnerability & empowerment is a perfect example of two opposites existing at once.
we each know the experience of having two emotions simultaneously, or loving someone who views the world in a way antithetical our own beliefs. another instance- to be in a relationship and still feel alone (or independent!)….. at this point i think you are starting to consider some examples of how contradictions exist in your life. how two elements, radically different, yet equal– still make sense together. somehow!
this is what today’s blog post is about –the tension of opposites. the way we can hold two contradictory things as equal. finding a way to balance between the two opposites.
i used this concept as the premise of an art project i developed for a class final. my idea was to present a project allowing each individual to explore their personal understanding of the “tension of opposites”. the instruction i gave was to “depict the tension of opposites in clay”. they received this instruction only after the clay was in their hands. my thought was, this would reduce the logical thought that went into the shaping of the clay. my hope was that their first thoughts, their initial response (perhaps their unconscious?) would guide them in creating a representation. i wanted their depictions to evoke the experience of the tension of opposites from an emotional place rather than from a more logical place.
this wasn’t an attempt to test a theory or hypothesis. instead, my interest lies in creating opportunities of artistic expressions that tap into the thoughts and trying to capture artistic representations of purely rational thought. here are the pieces that were made and a few photos i took that day as i photographed these mini sculptures.


i only had a short amount of time to photograph these sculptures after class. i am loving how they capture the light and the shadows of this room. it makes the contrast seem more stark. i wish that the background was more consistent. hope you can see how other people interpreted this concept…. maybe you will want to make your own tension of opposites art piece.


butterfly gaze
my love affair with butterflies has followed me around for as long as i can remember. and every morning in mexico i would look over the vast jungle from our porch on the 3rd floor watching all the various butterflies float and flap from tree to tree. huge black, brown, yellow & blue butterflies, who’s wings flapped slowly, rhythmically due to their enormity. small neon orange ones that were always in pairs, like they were playing tag. yellowish green ones blending into the trees and leaves hiding their flighty ways with their camouflage.
butterflies have continued to be on my mind…
i had this mini canvas sitting around and i knew i wanted to use it. i had painted it last time i had a lot of extra mixed paint laying around so it was ready to be used. i often start a new canvas or board even when i am in the middle of another project. it is so nice to have something that is ready for me to start the moment i have an idea to execute. i used a cut out image of the “blockhouse” and pasted it on the canvas. then i used water color to start blending the collage piece into the painting. then i used acrylic to finish up all other aspects of the piece.

blockhouse w/ butterflies (5x5in) collage, acrylic, and watercolor on canvas.
here are a few photos from this mosaic mural that i walk by sometimes. i hadn’t looked at it very closely before. as i was finishing this last painting i realized it was also full of butterflies….. of course!


happy monday! hope you get to see a butterfly this week. and if i may have a wish for this blog and it’s future….. i wish for many more butterfly posts.
no one wants to be a wannabe. but i can’t help but read other blogs and be excited by the photographs they take and the experiences they share. i’m not interested in having a travel blog…. just maybe traveling some more. in the U.S., in India, in Japan…. Europe is on my list too. for now though, i wanted to post some of the photos i took on my recent travels to the stone valley of Yosemite and to the Yucantan Peninsula in Mexico.
enjoy!
Yosemite


Mexico

stars & pods in Playa Del Carmen

Chichen Itza on the equinox, before the shadow & light phenomenon

skull pond

you can almost tell there are 40,000 people there
there are a lot of people in every shot i got of the pyramid during the sunset when you can see the snake moving down the pyramid. here is a video though….
i’ve been away…. and what a hiatus it’s been. one thought has moved consistently with me from school, to lesson planning, to Yosemite, to Mexico and has followed me back home as i sit down to write my first post in a few weeks. 
facial expressions seem artistically illusive and intellectually perplexing lately. i normally think of myself as someone who reads others well. conversely, i am also known to wear my heart on my sleeve as i am completely unable hide any of my emotions. the more i have read and studied facial expression though the more complex it has seemed to get.
before i left, i did sketch after sketch of facial expressions as a study for an art piece. the piece focuses on the faces of four individuals and i want each face to express true emotion. i posted an image of it here in my last post.
on vacation i somehow brought malcom gladwell’s book Blink rather than the fictional, all enveloping novel i was hoping to read. (i enjoyed reading Blink and there were many takeaways from it- but this post isn’t a review). one of the segments that stood out the most to me was the Facial Action Coding System (FACS). The name basically explains itself. it is a very technical and specific way of coding the way we interpret and express emotions through even the smallest movements of the facial muscles. now before i lose you…. this captured my attention and directly played into my desire to represent realistic facial expressions in my art and communicate them to the viewer.
this led me to wonder what the inventors of the FACS would say about the Mona Lisa?

or any of the other famous pieces of art that leave the viewer longing for more information about the subject portrayed in works like these.


i chose Girl With the Pearl Earring & American Gothic because they are some of the most recognizable art images. The last one is a close up of one of my art pieces. i love how simple and expressive her face looks.
currently, i am creating a lesson plan for a guest appearance in a 4th grade classroom where they are learning about jazz music. so i am creating a lesson plan that incorporates emotion, music and color. i am exploring ways for the participants to express their emotions by using facial expressions in their art pieces.
i remembered i have this book in my resource library. a vintage children’s dictionary given to a little boy named Jeff in 1977!


i am eager to do a project wit these little cut out images from the dictionary and still debating whether to use them all together or how i can create mini art pieces out of each one. i have so many ideas and trying to decide what to do next…..

at this moment i am seeing how i am in the middle of the tunnel before an artistic break though and simultaneously seeing my lifelong journey of decoding facial expressions.
school work, art, group projects, mini trips, procuring an internship and a big trip around the corner- all afloat in my mind. truth be told i like when life is like an overstuffed armchair, almost bursting at the seams. i forgot how much i like this busy feeling. i am also noticing that i don’t feel stressed and i am enjoying everything i am doing. what makes this busy time in my life different than other busy time when life feels stressful?

this week i helped a friend create a stress management related art project for teenagers. we developed some talking points about safe space, creativity, imagination and how these topics all relate to stress management. we then developed some activities involving writing, drawing, some small group work and practicing leading a meditation.
developing this project with her i found the answer to “why do i feel less stressed right now?”. this week has been filled with a lot of work but also a lot of other personally enriching activities. i walked a lot, experienced the ocean, saw wildlife, painted, saw photos of hours old puppies, drew, met new people and brainstormed for new projects.
so here are a few things for your viewing enjoyment…. that i hope you find de-stressing.
an ocean stop motion video. the ocean makes me feel better than anything else so i wanted to replicate the experience of being at the ocean that i can have with me. this is my first time making one… it’s rough but i am still glad i got to do it!
[youtube http://www.youtube.com/watch?v=nYdo42BkiBg&w=420&h=315]
a dog montage because i love dogs and i cant help but smile at silly dog photos.
along with an article about pet therapy
[youtube http://www.youtube.com/watch?v=Mg9WrxyLbBU&w=420&h=315]
not all of the images in the slideshow are mine. if you would like sources for them I’d be happy to tell you where credit is due!
a few snap shots of the painting i am working on as well as some of my sketches. stay tuned to see it’s completion!


sketches:


a thought for you!

make a de-stress playlist. like the old days of mix tapes or CDs revel in creating a mix of songs for yourself (or someone else) creating the mood you want to enter into when you start to feel your stress levels rise.
please share with me or other readers what you do to de-stress.

im not recommending this... i just love the image.
i went to bed last night thinking about leap day. i was so excited to post about this i lost sleep over thinking about what to post. i couldn’t resist. i woke up to find other posts and articles on this as well. i apologize in advance to those of you who aren’t particularly optimistic. but it’s leap day! i’m hoping you will thank me later.
do’s
- smile- you have en extra day for chances at amazingness! maybe it will help you have better luck parking. or maybe someone will offer to let you cut them in line. the possibilities are endless. smiling is also good for you.

kid self portrait art, very realistic btw

- get outside- where i am it’s raining but it would still be nice to spend 5 min outside appreciating, the cold wet rain and how the world looks through this lens.

mosaic mural in SF taken not too long ago. cherry blossoms, sigh.

- creative opportunist – whatever your passions are use this an excuse to get in some extra time with one of them.

acrylic, water color & pen on wood

- make a phone call- well that may be passé for some of you reading this. my thought was- who do you miss that you haven’t talked to in a while? reach out to them. say “hi” and if nothing else- wish them a “happy leap day!”
- be quiet- ponder where you are at this moment on this planet and think…. why? (or why not?) maybe even write those thoughts down.

wood cut print

- wear your favorite things- who doesn’t need an excuse to wear their favorite things just one extra day? my day can be made or broken depending on if i am comfortable in what i am wearing…. right down to my undies.

originally made to sell, but ended up living with me instead <3

- health is wealth! – do something nice for your body (i’ve listed some mind stuff above), whatever that means to you! stretch, move, appreciate.
- something you feel like you never have time for.


as a caveat- if what you need today is some extra time for nothing, take that instead. listen to yourself. find what you need, and take it!
DON’TS
- don’t take today for granted. it only comes every four years.

land of medicine buddha

happy leaping & enjoy your extra day!